Diane from My Time To Craft here again with a use your stash challenge.
We all have them. Those sheets of scrapbook paper that make us wonder what in the world we were thinking. Maybe you're addicted to paper stacks but some of the paper just isn't to your liking. Maybe you can't pass up the $2.99 price on a package of paper at Tuesday Morning. Whatever the reason, now you have all this paper you're pretty sure you're never going to use, but you don't want to just recycle it. So, what's a girl to do?
Think small.
Many times the paper that we do not love can often be used in small doses on other projects.
In going through my stash, I came across this paper.
I'm pretty sure it came from a stack about four years ago, but I really couldn't figure out what I would use this for...until I looked closer. If I avoided the "water damage" areas, the white speckled areas make for a good snowy sky. So, I took my scalloped circle punch and found just the right area for my project.
I decided I wanted to try making decorative magnets from the flat glass stones in the floral department. On the flat side of one of the stones, I used the smallest amount of Stickles and spread it across the surface. I let it dry completely to prevent the glitter from clumping up once I glued it together.
On the scalloped circle, I added a torn scrap of another blue lesser loved paper for the ground and cut a holly leaf to look like a tree. Out came the Stickles again for some sparkle and a gold pen for a star.
Once everything dried, I added a thin layer of glue to the back of the stone and pieced them together.
Once that dried, I glued a magnet to the back.
So how will you use your lesser loved paper?
Sunday, November 27, 2011
Use Your Stash: The Lesser Loved Paper
Friday, November 25, 2011
Sketch Challenge - Holiday Cards
Happy Black Friday! Diane from My Time to Craft here as your guest designer. The holiday season is upon us I'm sure plenty of you were out and about early this morning working on that holiday list, but don't forget about the holiday cards. Today I've created a simple sketch for use help get those cards under way.
As with most sketches, you can make this as simple or complex as you like. I find I usually start out very ornate, but by the time I get to the end, my cards are really simple (I just can't seem to assembly line craft).
This time of year, my Martha Stewart punches are often the tool of choice. If it's not the branch punch, then it's usually the holly.
In this first one, I used the holly to make a circular area behind a corrugated star that I inked with gold and wrapped in Holiday Divine Twine.
For the second, the holly created a traditional wreath. I love the crinkly Wassau paper used as the square in the first picture and the lace here.
I would love to see what your holiday cards are looking like. As with all PCWC challenges, follow the sketch or don't, it doesn't matter. Just have fun!
- Diane from My Time to Craft
Sunday, November 20, 2011
November Inspiration Challege
Hello all! Yep, it's me Caroline. As Allison said I've been working 6 days a week and most weeks 70+ hours so needless to say it doesn't leave much craft time for me. But this weekend I took a dew days off of work and have had some time get into my room. So yep, you know what that means .... Time for the November Inspiration Challenge. This moth it is a color challenge.

The colors are White, Blue, and Silver.
I just recently got my first Stampin Up order. Oh boy can I see many more orders in my future. Well in my first "shopping trip" I realized I didn't have many items to make some Hanukkah Cards. So I of course had saw this stamp in the mini catalog and loved how they popped the images on the stamp and new that I needed this stamp for some cards. Since I knew I wanted to lift that idea I figured this would be a quick card to make in the little craft time I had today.
So here's my card for the color challenge:

The card base is blue shimmer and silver shimmer and stamped on white card stock. The stars were stamped in gold and the rest of the stamp in black. And then a white sheer ribbon adhered to the card. I also cut a white base to put on the inside so the message could be written and seen since the base is blue paper.
Now it's your turn. Use Blue, White, Silver in your project. Hope you all have more crafty time then I've had. Can't wait to see what you do with Blue, White, and Silver.

The colors are White, Blue, and Silver.
I just recently got my first Stampin Up order. Oh boy can I see many more orders in my future. Well in my first "shopping trip" I realized I didn't have many items to make some Hanukkah Cards. So I of course had saw this stamp in the mini catalog and loved how they popped the images on the stamp and new that I needed this stamp for some cards. Since I knew I wanted to lift that idea I figured this would be a quick card to make in the little craft time I had today.
So here's my card for the color challenge:

The card base is blue shimmer and silver shimmer and stamped on white card stock. The stars were stamped in gold and the rest of the stamp in black. And then a white sheer ribbon adhered to the card. I also cut a white base to put on the inside so the message could be written and seen since the base is blue paper.
Now it's your turn. Use Blue, White, Silver in your project. Hope you all have more crafty time then I've had. Can't wait to see what you do with Blue, White, and Silver.
---Caroline
Thursday, November 17, 2011
Theme Challenge - Being Thankful
Happy almost Black Friday!! (My personal favorite holiday!) But since it is still a week away *sigh* I suppose I will have to give you a challenge! It's the third weekend of the month so that means a theme challenge and since that other holiday is getting near - you know the one where if you are lucky the stores open early? - this weekend's theme is being thankful. And in a little twist, I don't have a thanksgiving project.
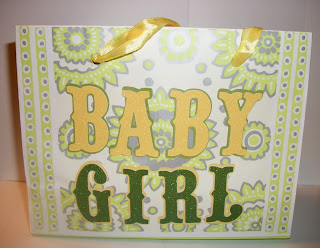
Instead I have this altered gift bag I put together for a colleague because I know how thankful they are that their baby girl! The phrase is from the Sugar and Spice Lite cart and I cut it at about 3 inches (you can't tell from the pic but it is a tiny bag). It is also hard to see some of the sparkle of the DCWV Lemon Flower Mat stack paper - but it was glittery!
So I can't wait to see your thankful projects and I hope I have shown you that they don't necessarily need to be about Thanksgiving - although that is okay too! Let's all get some crafting done before we start our shopping! Happy crafting!
---Allison
Sunday, November 13, 2011
Use - No Organize! Your Stash
Hey everyone! We have an unusual post for you today - but since Caroline is working 12 hour days and 6 day work weeks this is what happens when I am left to my own devices. Instead of presenting you with a challenge to use your stash - I am going to share with you some ideas on how to organize it! This is also the time of year when my craftroom must convert back to a dining space which is highly aggravating but a necessary evil .Now the only dilemma is where to begin??
How about paper? I have a little....a few... stacks which I store in my Jetmaxx cubes.I store my stacks vertically and I write the brand and stack name on the spine. As you can see I only have a few K and Company stacks ~ it's sad really. I store mostly by brand but some themes I do keep together. I do have one shelf dedicated to baby girl paper.
How about paper? I have a little....a few... stacks which I store in my Jetmaxx cubes.I store my stacks vertically and I write the brand and stack name on the spine. As you can see I only have a few K and Company stacks ~ it's sad really. I store mostly by brand but some themes I do keep together. I do have one shelf dedicated to baby girl paper.
My seasonal paper is not stored with the rest of my stacks - I store it in a buffet drawer but I use recycled flat rate boxes to organize it. LGuild from the Cricut messageboard has a great post on how to do that here. My 8x8 stacks are stored in a Really Useful Box from Staples on top of the rest of my cubes.
As far as cartridges go, mine are stored in my Cgull bag and the boxes are stored in a tote in the basement where my husband can never count them ~ I mean ~ where they are out of the way. My bag was getting just a wee bit full so I recently purchased two of the ArtBin cartridge organizers, one for my seasonal carts and one for lites and project/event carts. I didn't think these were a necessity but they freed up some space in my bag and two of them fit inside the bag width wise.
I also happen to be one of those people who absolutely still needs the books, and mine are stored in my buffet drawer using Okie's system that she has a video about here.
My only advice is to use extra adhesive on the tabs because they do not stick very well. And we can move onto stamp storage. I store my studio G stamps in a large binder meant in sleeves meant for baseball cards.
I found them at the dollar store and already had the binder so this was a very inexpensive storage solution! My other stamp sets I store in mini binders I also found at the dollar store - organized by what made sense to me.
I find it much easier to use my stamps now that they are stored this way - they are much more accessible.
This pic reminds me ~ I need to use these stamps soon!
I store them in 5x7 plastic sleeves that I found at Staples - and they also have sleeves for 4x6 photos with a smaller pocket if you are looking to store something smaller.
This leads me to my next area of storage - my Cuttlebug folders! After organizing my stamps, I decided to move my folders to mini binders as well - which Staples carries a line of in all colors for around 6.99 I believe.
Again I use the same plastic sleeves and then put all the binders in another Really Useful Box. Pam from Papillon Digital Designs shared her own stamp organization a few weeks ago - and you can see that here.
And finally you may be familiar with my twine storage solution seen below, but in case you are not, you can see the original post on my personal blog here.
And those are my best tips and hints for good craft room organization! Well that and capturing an organizing fairy and putting her to work ~ and since I am still looking for her I don't recommend this as a definitive solution.
So your challenge for today is to organize your stash! Or in lieu of that - take a picture of your best storage solution and share it here! Happy organizing!
---Allison
Friday, November 11, 2011
Use Your Stash - Use Your Cartridges or Cuts
Happy Friday! I was able to get one project done last week and it is a variation of my monthly card sketch, which you can see here, but not exactly the card I had planned - oh well! And since this is "use your stash" weekend I decided to use one of the (many) unopened carts I had lying on my table. I am very good at buying cartridges, but not always the best at actually using them. This card actually uses Sophie, the Cricut Circle exclusive, that a most wonderful friend sent me in the mail as a surprise. Now only a few (or 7 or 8) more carts to get open and use!
This was a card for a 16 year old boy - which presented quite the challenge - so I kept it simple and tried not to over think it.
This was a card for a 16 year old boy - which presented quite the challenge - so I kept it simple and tried not to over think it.
I used one one of the doily shapes from Sophie - cut at around 4.5 inches so that it would fit on the front of the DCWV card base. Then I used some embellishments I had found on clearance at Hobby Lobby (more stash items) - the sentiment is popped up so that the candle fits underneath. Like I said, quite simple because I tend to get myself in trouble when I think too much about cards and I only had a short time to make it.
So this weekend's challenge is to use a cart you haven't - or if you have another machine - use a new cut or svg that perhaps you bought and haven't had the chance to use yet. we can feel less guilty about taking advantage of all the early Black Friday sales if we use what we have! Happy Veteran's Day and happy crafting!
---Allison
Sunday, November 6, 2011
November Product Challenge ~ Beads, Beads, Beads
So this week has totally kicked my butt. I have had zero mojo, inspiration or creativity. So I decided I was going to play with something that I've been seeing everywhere I look BEADS!!!! It seems like they want me to use them. So I got out my little box of beads and started playing.
So I decided I would make a quick lanyard which could be used on your cell phone, gypsy stylus, zipper pulls whatever suits you

Then I decided to try to make some of those fun stick pins that I'm seeing on cards and layouts. Can't wait to add this to a future project. They are super simple to make and only take a few minutes to make all of them

Now you don't have to use large beads like those you can also use seed beads, letter beads, or even micro beads in your projects

Here are two images where I used microbeads in my projects


Now let's see what you can do with beads!!!!!
So I decided I would make a quick lanyard which could be used on your cell phone, gypsy stylus, zipper pulls whatever suits you

Then I decided to try to make some of those fun stick pins that I'm seeing on cards and layouts. Can't wait to add this to a future project. They are super simple to make and only take a few minutes to make all of them

Now you don't have to use large beads like those you can also use seed beads, letter beads, or even micro beads in your projects

Here are two images where I used microbeads in my projects


Now let's see what you can do with beads!!!!!
---Caroline
Friday, November 4, 2011
November Sketch Challenge
I am here with this month's sketch challenge ~ and a big heaping spoonful of apology as I have the sketches but sadly no projects to share. I really wrestled with posting this week because between Halloween, a cold kicking my butt, parent conferences, and some other issues I just couldn't get the projects done. The most frustrating part is that I can "see" them in my head I just couldn't get them complete and on paper! But then I kicked my own butt and reminded myself this is supposed to fun and be my stress relief and not creating additional stress - so here I am and here are the sketches!
I really hope that things are going much better for all of you and you get a chance to do something with these. I promise that I am going to try my darndest to do something with them this weekend - and if I get the chance I will edit this post and put them here or post them next weekend! I hope you can forgive my lack of effort!! And I wish you all happy crafting!
 |
| Layout Sketch |
 |
| Card Sketch |
---Allison
Tuesday, November 1, 2011
Technique Tuesday-Flowers are Fun to Make
Hello PCWC followers! Thanks to Caroline and Allison for inviting me to be the first Technique Tuesday guest instructor here on their awesome blog.
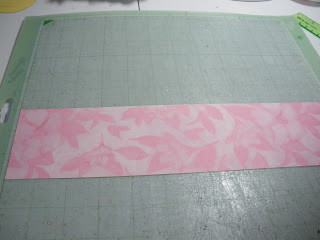
Since I have a lot of pictures, I'm going to dive right into the tutorial. I love making flowers and have been blessed to have a friend who has been more than willing to teach me a few different techniques and styles. The first flower I'm going to share with you uses cardstock. I chose a 12 X 3 double sided cardstock scrap I had in my scrap bin. It's from the K & Co Spring Blossom paper stack.
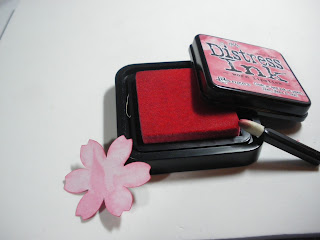
Isn't it pretty? I cut 5 flowers from Mother's Day Bouquet (flower #7 @ 2.75", 2.5", 2.25", 2", 1.75"). Next I inked the edges of both sides with Worn Lipstick distress Ink from Ranger Ink.
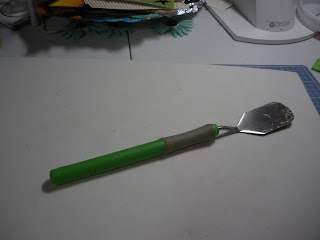
Now, find a crafting tool that has a nice handle, preferably with a rounded bottom. If you have the Cricut tool kit, you should have several of these handles available to you. I used the Cricut spatula.
And a piece of fun foam. I purchased this for 99 cents at Michaels. This inexpensive mat has been an invaluable tool for me. I purchased it to use when stamping images, but have used it even more for making paper flowers. It has the perfect amount of "give" for rounding flowers.
Place a flower cut on the fun foam and using the handle of your spatula, press into the flower, using a constant circular motion.
Continue the circular motion around the whole flower, including each petal, and also between petals. The flower will start to curl inward.
Do this with each of the 5 flowers. Once done, stack them from largest to smallest. I stacked the two largest, and then the 3 smallest, in anticipation of having to poke a hole (5 layers are hard to poke through all at once) in the center.
I used my Tim Holtz Tonic Studios retractable paper piercer . I have discovered that Tim Holtz has the BEST tools! That is a saying me and my crafting buds share, and it seems to be true. After piercing the layers, I added an extra special brad (purchased from the Eyelet Outlet).
I decided to emboss some leaf stamps using Versamark, embossing powder and a heat gun. Caroline, your Technique Tuesday tutorial was not lost on me!
I fussy cut them, and they, and my flower, are ready to be used on a project.
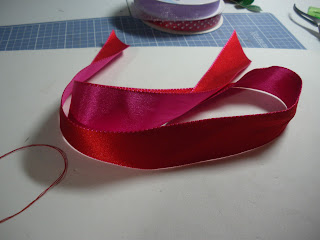
Onto the next flower. This one is one I was not officially taught to do, but figured it out on my own. It's very simple. I have been saving this gorgeous ribbon scrap that I received on a Christmas gift for a year or two, waiting for the right time to use it. Well, the time is now.
After choosing your ribbon, find some coordinating thread in your sewing kit. Thread a need, and tie a knot. You will want to use double thread.
Sew a running stitch close to one edge of the ribbon, from one end to the other.
After you have reached the end, lay the ribbon down and flatten it. Now, holding one end of the thread, pull the ribbon down toward the knotted end of the thread to form a ruffled ribbon.
It should look like this when you are done.
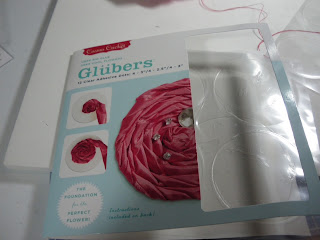
Next I used Glubers (large glue dots made by Cosmo Cricut for flower making).
This pack has multiple sizes. 4@ 2", 4 @ 2.5" and 4 @ 3". For this flower I used a 2" Gluber. I cut the Gluber, keeping it on the backing, to make it easier to use.
Next I took the ruffled ribbon and started the flower by placing it on the outside edge of the glue dot, and pressing it down onto the glue.
It was very easy to shape the ribbon to the glue circle. I went around the outer edge and then moved on towards the center with a second row.
I continued until I had covered the whole inside of the glue dot. I did not have to cut any excess ribbon (this was shear luck). Once I had covered the whole dot with the ribbon, I cut off the excess thread that I had left on the ribbon.
I did not have a large enough self adhesive pearl for this flower, so I decided to create something using two different size pearls. One is made by Martha Stewart, the other by Recollections. I apparently forgot to take a picture of this flower after adhering these pearls, but you will get to see the finished result at the end of this tutorial.
Hopefully you are still in the mood to see another ribbon flower. This was one of the first I learned to make, and it is so easy and I love the result.
First, punch a circle. I find a 3/4 inch circle works best for me, but I lent my 3/4" circle punch to a friend so I had to find something else. Enter the largest flower from the Stampin Up Boho Blossoms Punch.
I used a Zotz medium glue dot (I'm pretty sure it's a medium glue dot, but I can't be 100% sure because I threw away the box) and attached it to the middle of the punched flower (the one you see in the background is not the Zotz glue dot, I tried a thinner glue dot and it's not as good....use the thick ones).
Next, I took a 1/4 satin ribbon (the kind you can get at Michaels on sale for like 5 for a $1.00) and tied a knot in the end of the ribbon.
I started my flower by smooshing the knot into the center of the glue dot. I pushed the cut edge into the dot as well.
Now, once the edge is placed into the glue dot, I twist the ribbon and wrap it in a circle motion around the center knot.
and I continue....
twist, wrap, push into glue dot
Keep going until you have covered the whole glue dot.
Cut the ribbon leaving a very small tail (about 1/4 to 1/2 inch). Now, using a paper piercer, stylus, or something with a small pointy edge.....
tuck the ribbon tail into the glue dot (under the twisted ribbon).
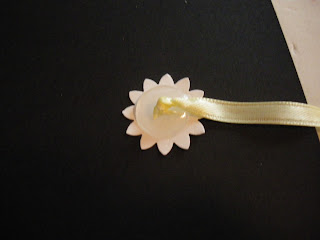
It should look like this. Now, cut around the glue dot (removing the petals) and you will have a ribbon flower...
I've also left the petals on and used the ribbon as the flower center. The choice is yours.
Now, I have 3 flowers to use as embellishments for cards, scrapbook layouts or altered art.
Sorry for the long tutorial, but I wanted to share as much as possible. I would love to see any flowers you make using one of these techniques. As incentive, I am giving away a roll of satin Stampin Up ribbon. I think I will give away Real Red, in honor of the upcoming Christmas holidays. The winner will be chosen from anyone who posts a flower (using one of these tutorial methods) using the Inlinkz tool.
Deadline to post is next Tuesday, November 8th. The winner will be chosen at 9:00 PM EST.
Thanks for stopping by!
Carole from onmycraftroomwall
Since I have a lot of pictures, I'm going to dive right into the tutorial. I love making flowers and have been blessed to have a friend who has been more than willing to teach me a few different techniques and styles. The first flower I'm going to share with you uses cardstock. I chose a 12 X 3 double sided cardstock scrap I had in my scrap bin. It's from the K & Co Spring Blossom paper stack.
Isn't it pretty? I cut 5 flowers from Mother's Day Bouquet (flower #7 @ 2.75", 2.5", 2.25", 2", 1.75"). Next I inked the edges of both sides with Worn Lipstick distress Ink from Ranger Ink.
Now, find a crafting tool that has a nice handle, preferably with a rounded bottom. If you have the Cricut tool kit, you should have several of these handles available to you. I used the Cricut spatula.
Place a flower cut on the fun foam and using the handle of your spatula, press into the flower, using a constant circular motion.
Continue the circular motion around the whole flower, including each petal, and also between petals. The flower will start to curl inward.
Do this with each of the 5 flowers. Once done, stack them from largest to smallest. I stacked the two largest, and then the 3 smallest, in anticipation of having to poke a hole (5 layers are hard to poke through all at once) in the center.
I used my Tim Holtz Tonic Studios retractable paper piercer . I have discovered that Tim Holtz has the BEST tools! That is a saying me and my crafting buds share, and it seems to be true. After piercing the layers, I added an extra special brad (purchased from the Eyelet Outlet).
I decided to emboss some leaf stamps using Versamark, embossing powder and a heat gun. Caroline, your Technique Tuesday tutorial was not lost on me!
I fussy cut them, and they, and my flower, are ready to be used on a project.
Onto the next flower. This one is one I was not officially taught to do, but figured it out on my own. It's very simple. I have been saving this gorgeous ribbon scrap that I received on a Christmas gift for a year or two, waiting for the right time to use it. Well, the time is now.
After choosing your ribbon, find some coordinating thread in your sewing kit. Thread a need, and tie a knot. You will want to use double thread.
Sew a running stitch close to one edge of the ribbon, from one end to the other.
It should look like this when you are done.
Next I used Glubers (large glue dots made by Cosmo Cricut for flower making).
This pack has multiple sizes. 4@ 2", 4 @ 2.5" and 4 @ 3". For this flower I used a 2" Gluber. I cut the Gluber, keeping it on the backing, to make it easier to use.
Next I took the ruffled ribbon and started the flower by placing it on the outside edge of the glue dot, and pressing it down onto the glue.
It was very easy to shape the ribbon to the glue circle. I went around the outer edge and then moved on towards the center with a second row.
I continued until I had covered the whole inside of the glue dot. I did not have to cut any excess ribbon (this was shear luck). Once I had covered the whole dot with the ribbon, I cut off the excess thread that I had left on the ribbon.
I did not have a large enough self adhesive pearl for this flower, so I decided to create something using two different size pearls. One is made by Martha Stewart, the other by Recollections. I apparently forgot to take a picture of this flower after adhering these pearls, but you will get to see the finished result at the end of this tutorial.
Hopefully you are still in the mood to see another ribbon flower. This was one of the first I learned to make, and it is so easy and I love the result.
First, punch a circle. I find a 3/4 inch circle works best for me, but I lent my 3/4" circle punch to a friend so I had to find something else. Enter the largest flower from the Stampin Up Boho Blossoms Punch.
I used a Zotz medium glue dot (I'm pretty sure it's a medium glue dot, but I can't be 100% sure because I threw away the box) and attached it to the middle of the punched flower (the one you see in the background is not the Zotz glue dot, I tried a thinner glue dot and it's not as good....use the thick ones).
Next, I took a 1/4 satin ribbon (the kind you can get at Michaels on sale for like 5 for a $1.00) and tied a knot in the end of the ribbon.
I started my flower by smooshing the knot into the center of the glue dot. I pushed the cut edge into the dot as well.
Now, once the edge is placed into the glue dot, I twist the ribbon and wrap it in a circle motion around the center knot.
and I continue....
twist, wrap, push into glue dot
Keep going until you have covered the whole glue dot.
Cut the ribbon leaving a very small tail (about 1/4 to 1/2 inch). Now, using a paper piercer, stylus, or something with a small pointy edge.....
tuck the ribbon tail into the glue dot (under the twisted ribbon).
It should look like this. Now, cut around the glue dot (removing the petals) and you will have a ribbon flower...
I've also left the petals on and used the ribbon as the flower center. The choice is yours.
Now, I have 3 flowers to use as embellishments for cards, scrapbook layouts or altered art.
Sorry for the long tutorial, but I wanted to share as much as possible. I would love to see any flowers you make using one of these techniques. As incentive, I am giving away a roll of satin Stampin Up ribbon. I think I will give away Real Red, in honor of the upcoming Christmas holidays. The winner will be chosen from anyone who posts a flower (using one of these tutorial methods) using the Inlinkz tool.
Deadline to post is next Tuesday, November 8th. The winner will be chosen at 9:00 PM EST.
Thanks for stopping by!
Carole from onmycraftroomwall
Subscribe to:
Comments (Atom)


