Friday, September 30, 2011

Anything Goes! The Pumpkin Edition

Happy Friday!! It's the 5th weekend of the month and what that is going to mean around here is that it is an anything goes weekend - we get to get wild and crazy and post a project of our choosing to inspire you. So hold onto your machines - going to get rowdy up in here!! I decided to make a 3-D pumpkin that can double as a treat container! and the best part - is it is super easy! And I loved it so much I made a few different variations! This is my kind of crafty good time!


Another view

I was totally inspired for this pumpkin by going through the Oriental Trading Catalog - I saw the picture of a kit they were selling and thought "I can do that" - and without paying for the kit! For this pumpkin I used orange cardstock, green core'dinations embossed with Divine Swirls, and some curly Trendy Twine.

Oh you want to know how I made it?? I suppose I could show you - but let me show you my favorite pumpkin first! This is the Halloween edition - and you should know right now that I seriously heart Halloween - so I am so in love with how this turned out. In fact I love it so much I may be crazy enough to make a bunch of them for my daughter's religion class. So without further ado - ta-da!!


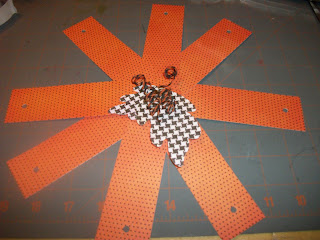
And now for the instructions! I started with 8 strips of paper cut into 1 1/2 by 6 inch strips - you get that many out of one 8 1/2 by 11 piece of paper. Those strips need a hole punched at each end about 1 inch in. (This paper is DCWV Midnight Spell.) Then you also need two leaves from Mother's Day Bouquet (cut at 2.5 and 3 inches), some baker's twine that I made curly and two brads. 

Thread the twine in the center of one of the brads - I realize it is hard to see but there is a brad in there. 

Then attach the brad to the leaves and all the strips of paper and fasten them together. 

Fan out the strips into a star shape and then flip it over. 

Starting with the piece that is closest to you - put the second brad the opposite way - with the top on the inside of the pumpkin. 

Then add all the other pieces - and I have found the easiest way to do that is to go around the circle. If you are going to fill with candy - leave the last piece unattached so you can put the candy in. 

Fill the inside with candy - I used gum because the Hershey's kisses I had bought for this project had mysteriously disappeared - yeah that's what happened to them. 

Then you can add the last strip and seal it up! Putting the brad the opposite way makes it easier for the receiver to open if they don't want to slide the pieces apart. 

and then I will say it again: ta-da!

And guess what?? I am not even done yet! Someone posted on the Cricut message board is anyone had directions for a 3-D acorn - and I got to thinking (always a dangerous occurrence) and while I don't love it as much as the pumpkins (shh! don't tell)  it isn't completely terrible. 


In the acorn's case,  I welded some leaves together, ran it through the mesh cuttlebug folder, and lightly inked it. The bottom is done with kraft cardstock. 

And now my part of the party is done - time to pass the party torch onto you guys and see what happens! Remember - this weekend's theme is "anything goes" - so if this project reminds you that you have to do a Christmas card  and that is what you make and post- I am okay with that! Happy crafting!

---Allison


Thursday, September 29, 2011

We have a Winner

The winner of Carole's Blog candy a $10 Michaels gift card chosen by Random.org is


Comment #4 - Dayna Sabrina


Please e-mail us your address at pcweekendchallege@gmail.com so Carole can get your prize out to you.

Sunday, September 25, 2011

My Challenge-an Alliteration

Hello, crafters! Carole here with the Sunday edition of this week's Paper Craft Weekend Challenge. I am so thrilled to be guesting here on Allison and Caroline's challenge blog...thanks for giving me this wonderful opportunity, ladies!

And now for the challenge. A little background first. When I first was on the Cricut message board I stumbled across a card challenge/swap group that I totally fell in love with. The leader of the group was Card Junkie (aka Sherrie Miller) and she did an awesome job. Every month she gave us an alliteration (I didn't even know what that was until I joined the group) and it was through these challenges that I was encouraged to use a wide variety of design elements in my card designs. So in honor of that group here is my alliteration challenge to you.....Red with Ribbon.  And here is my card for this challenge:

The recipe:
Card is A2 size.
Cardstock: Real Red, Black (Stampin Up)
Patterned paper: Newsprint (Stampin Up), Black and White paper stack (Me and My Big Ideas)
Cricut cuts: 4.75 inch circle (newsprint) and shadow (red)-George and Basic Shapes; "hello"- .65-Cursive 101- sizing and welding done on Gypsy
Paper punch: Boho flowers (Stampin Up)
Black ribbon-Narrows-bought on sale at Michaels
Medium glue dots (Zotz), pop dots (Stampin Up), adhesive of your choice (mine is ATG gun and tape)

Create A2 size card from black cardstock. Cut red mat at 4-1/8" X 5-3/8" and adhere to black card. Cut black printed paper at 4-1/16" X 5-1/4" and adhere to red card mat. Adhere newsprint circle to red shadow circle. Place about 2/3 of circle on card and adhere. Cut extra 1/3 of circle off using card fold as a guide. Cut welded "hello" from red cardstock. Adhere to lower right hand corner of card. Make and adhere ribbon center flowers to circle with pop dots. See ribbon center flower directions below:

Punch 3 of the largest Boho flowers from red cardstock using the Stampin Up punch. Place glue dot in center of punched flower. Using length of narrow black ribbon (start with about 15"-not sure how long so this is a safe bet) tie a simple knot at one end of ribbon. Place knot with "tail" side down into center of glue dot. Twist the ribbon as you wind it around the center of the knot, placing it into glue dot to adhere in place. Continue twisting and adhering ribbon with this method until the glue dot is completely covered with the ribbon. Cut off excess ribbon. Using a sewing needle or any thin, pointy object, tuck end of ribbon under the twisted ribbon into the glue dot to secure in place.

And there you have my Red with Ribbon creation! Now, let's see yours. To motivate you all, I am giving away a little blog candy. If you leave a comment you will receive one entry, link a Red with Ribbon creation and receive another. Contest ends midnight, Wednesday evening (September 28th). The prize is a $10 Michaels gift card. Winner will be chosen randomly (as soon as Caroline tells me how to do it) and announced Thursday morning around 8:00 am. Good luck!


Friday, September 23, 2011

Button, Button Who's Got a Button...

Hi scrappers! This is Kate from Sassy and Scrappy and I'm thrilled to be here with you all today. If you read my bio you know I have several crafting loves, but one I didn't mention is buttons. I love buttons! I use them on cards, layouts and even home decor projects. I'm going to share a few of those with you today.

First up is a home decor project:


I purchased this plain black frame and decided to spruce it up a little. As you can see I adhered buttons to the center of some of my flowers. I love the additional depth and texture they added to a "plain jane" frame.


Next up, a scrapbook page:


Here you can see I used buttons for wheels on my die cut car. I have done this several times and love how is spices up an other wise ordinary car.


For my project today I used buttons to create a border for my scrapbook page. This is the first time I've tried this, but I think the result is REALLY fun. I kept the rest of the page very simple, as always when I create a page I want the focus to be on my picture/s.


To adhere buttons I like to use glue dots, although on this page I sewed some of the buttons straight to the paper. What I love about buttons is that they're so diverse, and you can utilize them in countless ways.


Details:
  • Kraft cardstock: Bazzil
  • Pattern Paper: My Mind's Eye 'Stella and Rose'
  • Buttons: Papertrey Ink
  • White embroidery floss
  • Labels: October Afternoon
  • Stamps: Technique Tuesday 'A Date With Ali' and 'The Observant Traveler'
  • Ink: Jenni Bowlin 'Chicken Feed' and 'Cough Syrup', Memento 'Tuxedo Black'
  • Color Mist: October Afternoon 'Paper Doily'
  • Brad: My Mind's Eye
So what is your challenge?! Buttons!!! Use buttons on a card, layout or altered item. I can't wait to see what you come up with! Thanks for stopping by, have a great weekend.


Thursday, September 22, 2011

Welcome to our first Guest Designers!

We are delighted to usher in our first weekend of guest designers.Once a month we are going to invite our friends to come play with us! I am quickly discovering that the best part of this blog is seeing all of the great work everyone is linking and then getting to discover (or re-discover in some cases) your blogs! So let's keep it up! This Friday, Kate from Sassy and Scrappy will be leading us in our first challenge, and then on Sunday Carole from On My Craftroom Wall will be inspiring us for the next one. You can see their pictures and bios on our Guest Contributors Page. I can't wait to see what they (and you) have in store!

Saturday, September 17, 2011

Inspiration - Photo Inspiration

Hi Everyone! Caroline here with another challenge for you. This week's challenge is an inspiration challenge. I decided we would use a photo for our inspiration.

I chose this photo from my vacation to North Carolina last year because here I am planning my annual trip there this November. I love the colors in this photo and am bummed that I'll probably miss the leaves this year as we are going later than usual. Oh well there will still be some great photo opportunities.


So using the colors from the photo I decided to make this fall card


Since getting my promarkers I'm having so much fun coloring stamps. One of the features that I love most about the markers is that the ink doesn't streak so you get a full coat of color. The one thing I've learned using them is I sure don't have enough colors. I know what I'll be getting for Christmas ;o)

I also tried another technique on this card .... the ribbon. That's not really ribbon. Well not the conventional kind of ribbon anyway. That's the crinkle ribbon that people are making. I used the seam binding and dyed it to the color I wanted crinkled and let it dry. OMG I love that stuff.

Now let me see what you can make using the photo as your inspiration!!! Happy Crafting!

--- Caroline


Friday, September 16, 2011

Something New - Ribbon Card

Are you ready for the weekend? I know I am!! This Friday's challenge is to try something new! so I decided  to try a new kind of card - and to be honest - I think it came out pretty sad looking. But I am not scared to show you my sad little card - maybe it will inspire you to create something much better! This post should also be called "Why Allison should not make cards"  Onto the sad card:


I was inspired for this card by a beautiful wedding invitation I got in the mail but I am not doing the inspiration justice. I really love the style of this card and yet I have no idea what is called so I am calling it a ribbon card. 

I took a 5 1/2 by 12 inch strip of K and Company kraft patterned cardstock and scored it at 2, 4, 8, and 10 inches. Then I punched some holes with my Big Bite for the ribbon o go through. Here is the card "unfolded" so you can see how it folds to meet in the middle:  


I cut two 3 inch  pears from Preserves and layered them over each other (a pair of pears! - sorry can't help myself sometimes). I adhered them to the front of the card while it was closed and then used a razor to split them down the middle. I was not happy with the way that came out at all so if I were to do it again I probably would cut them first and then apply them to the card. 


Then it was time to put the ribbon in - which is honestly my favorite part.  You loop the ribbon towards the center of the card. 

And then bring the ends through the whole toward the front of the card. 

You can trim the ends if they are too long and then you are done!

So that is my little sad card! While I am not pleased with the way it came out I do like the style so I expect I will be trying it again. I can't wait to see what new things you all try! Happy crafting!

---Allison


Thursday, September 15, 2011

We have another winner ....

The winner of the Twine package


selected by Random.org is ............


Comment #12 - Carole


Please e-mail us at pcweekendchallenge@gmail.com your mailing address and we will get your prize out to you.


---Caroline

Tuesday, September 13, 2011

And the winner is ......

The winner of the Technique Tuesday Blog Candy

Cricut markers, flocking powder set, chipboard shapes, stickers, and embellies set

selected by Random.org is ............


Comment #8 - Maria


Please e-mail us at pcweekendchallenge@gmail.com your mailing address and we will get your prize out to you.

There is still time to get in on the Twine Blog candy the winner will be selected on Thursday!!!!

---Caroline

Sunday, September 11, 2011

Use Your Stash - Twine

Hard to believe it's Sunday already and my vacation is over :o(. This weekend is use your stash weekend. Cause we all know that we have enough supplies to last us a long long time. Well dig into your stash and pull out that baker's twine. What you don't have any twine? Well then make some. Don't know how to make any twine ... read below and learn how.

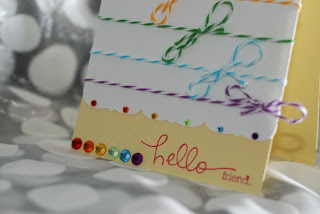
So of course Allison turned me onto Baker's Twine a while back and we just had to have it so we got some then a wonderful Circlet sent me a whole bunch of color samples that I didn't have and then we found the tri color twine and Allison and I were hooked. So of course we probably have more than we will ever need but the colors are sooooo yummy. Whenever I'm shopping for twine and I see all the rolls pictured together I think they look like a beautiful rainbow of color which was my inspiration for this project. So today I decided instead of drooling over them to actually use them. So here is my project inspiration for you


Now like I was mentioning a fellow circlet turned me on to a website where you can make your own baker's twine. DIY Baker's Twine

So of course I thought I'd give it try especially when you might only need a teeny tiny bit of a particular color and the results weren't bad


but of course this doesn't mean I'll stop purchasing baker's twine cause I still LOVE it! But it's a great alternative.

Now who wouldn't love some blog candy?!?!? I'm offering some twine for one of our lucky readers. It's the Orange and white, Christmas twine (green and red) and the Halloween Twine (orange, white, black), and some of the Crochet twine to make your own (sorry forgot to include the white twine in the picture).


To be entered for the twine all you need to do is leave a comment here. If you post a twine project you will get a second entry to the drawing. Drawing will be held on Thursday September 15th!!!

Can't wait to see your projects.

---Caroline


Friday, September 9, 2011

Use Your Stash - Chipboard Letters

TGIF!! Happy Friday! As it is the end of the first week of school I know I am going to look forward to today!! before we get to the challenge, I want to remind you to go back and leave a comment HERE on Caroline's embossing tutorial - you have until Monday to enter for blog candy! Now onto the challenge!

For the second week of the month we will be focusing on using your stash - you know - all that stuff we seem to buy but not actually use?? So this weekend's challenge is to use chipboard letters, or if you don't have any, chipboard shapes.   I seem to have an endless amount of chipboard that has found its way into my home but not my layouts. I personally blame Marshall's - they are the ones who got in all those DCWV sets for ridiculously low prices! and now for the project:


My inspiration actutally came from the sparkly chipboard shapes, which are DCWV All Dressed Up. I knew they would go perfect with these pics of my daughter modeling last year's easter outfit. The paper is from the DCWV All About Girls stack, except the photo mats which are from the Shimmer stack. The title letters are K and Company Amy Butler Lotus Faded China Alphabet. I also dressed it up with adhesive pearls from Say It With Pearls. Here's a closeup - I love the sparkly shoes! 


I am proud to say that all of the supplies were from my stash and had been sitting around waiting to be used! Now I just have to get off my butt and finish the journaling - which I somehow always procrastinate. The projects that you all have been linking have been fabulous - and I love visiting your blogs. A reminder though - you don't need a blog to participate - you can upload from your computer or link it to a message board.  Caroline will have another stash challenge on Sunday, but I can't wait to see what you make with this one! Happy crafting!


Tuesday, September 6, 2011

September Technique Tuesday - Heat Embossing

Hi, Caroline here with our first Technique Tuesday. Technique Tuesday will be the first Tuesday of each month. Technique Tuesday will be where anything goes. It could be a tutorial, tips and tricks, organization ideas, a new product we found. Basically it will be anything we wish to share that month with our readers. For this month we decided we would talk about embossing. Why embossing? Well cause Allison calls me the embossing queen.

There are 2 types of embossing. The first is "dry embossing" as I call it. Dry embossing uses texture plates or embossing folders. There are several different brands and types. I prefer the cuttlebug or sizzix embossing folders that can be used in many different types of machines. We won't talk about how many embossing folders Caroline has .... but let's just say that's part of the reason Allison calls me the embossing queen. The second type of embossing is "heat embossing". Wet embossing uses ink and embossing powders which you melt or set with a heat gun.

Since heat embossing requires a bit more technique we will focus on that today. In order to heat emboss you will need the following supplies:

1. Embossing powder
2. Versamark Ink pad (or any wet ink pad (slow drying)), I prefer versamark.
3. Heat gun
4. Stamp(s)
5. Static buddy
6. Cardstock


First cut your cardstock to the size you want. I always make my cardstock slightly larger than I need so that I have an edge to hold when heating the powder. You can always trim the excess off after you've set the powder.

Rub your static buddy on your paper. If you don't have a static buddy you can try rubbing a used dryer sheet on your paper. However, I found that the dryer sheet wasn't working completely and got frustrated and picked up a static buddy from Michael's for a few dollars.


Stamp your ink pad onto your stamp. I find the best way to apply ink to the stamp is to turn the stamp over and dab the ink pad onto the stamp. You can actually see the ink on the stamp then.


Stamp your stamp image on your paper. Make sure to use strong even pressure


Remove your stamp from the paper and you should see a watermark image on your paper


Sprinkle your embossing powder over your stamped image.


Remove the excess embossing powder and return to the container


Heat the embossing powder with your heat gun. Be sure to continue to move the heat gun over the paper or you could burn the paper. You will see the powder change from little grains to one thick coat. If you don't have a heat gun you can use your toaster oven and place a little metal tray on top of the oven and stick your paper on the metal tray. Do not leave the paper unattended as it can burn if your oven gets to hot.

If your paper wrinkles, like the picture below turn your paper over and put a little bit of heat on the back of the paper and it will flatten the image.


Trim your image to fit your project needs and complete your project


You can also use the verasmark pen to do writing on your project or outline an image


To see more of my heat embossing projects your can see them on my blog Caroline's Heat embossing projects

Now it's your turn. We'd love to see what you've done with heat embossing. Use the inlinkz option below and upload your projects.

Do you want to win some blog candy???? Look what Allison has up for grabs for all of our Paper Craft Weekend Challenge readers.

Cricut markers, flocking powder set, chipboard shapes, stickers, and embellies set


All you have to do to win is leave a comment here and be a follower. If you upload a heat embossing project you will get a second entry to the drawing. Drawing will be held on Monday September 12th.

Hope you've enjoyed our exploration into Heat Embossing.

---Caroline