Showing posts with label Guest Designers. Show all posts

Sunday, January 29, 2012

Magazine Challenge

Hello Everyone :)
Kymberlee here from The Paper Midwife. This is my first post here at Paper Craft Weekend Challenge as I totally spaced off the my original first posting date. OOPS! Allison and Caroline were sweethearts to forgive me AND gave me another chance to redeem myself. I am so blessed to call these ladies friends. For those of you that don't know me, I am having a crafting crisis right now. My brother has taken up temporary residence in my craft studio. This is agonizing for me as my studio is my safe haven in my crazy busy life.

Okay enough with the idle chatter, lets get on to today's challenge which is  - What can YOU do with an old magazine?

I was cleaning up the house today with my husband's "help" and he says "Gee it is too bad you can't find something CRAFTY to do with ALL these magazines your have piled up!" Okay, butt head CHALLENGE ON! By the way... I had TWO magazine sitting beside me (eye roll)

So here is what I did with 1 Old magazine, a pair of scissors and my ATG -

First I ripped the front and back cover off the magazines because with this particular magazine they are a little thicker. Then I tore each individual page out and anything that had GREEN on it I set it to the side in another stack.


I then cut the covers and inserts into a heart shape and layered them for strength. This was my base


I cut the full sheets in half


Then I folded up each strip


and rolled the tri-folded strips into "flowers"

I used my ATG to roll a grid onto my heart shape and then started adding my "flowers"

I used the green pages I set aside to work them into folded "leaves"

Added a bow I fashioned from a pink colorful page and an image I colored

I even found a few butterflies in the pages that I added


HAH! Take that dear husband! And next time he says "Too bad you can't do something crafty with THAT," I am going to roll it up and smack him with it!

I am sure YOU have an old magazine or two laying around.
What can YOU do with it?


Friday, January 27, 2012

Wreath Challenge

Hi Everyone!  My name is Elise, a.k.a. Lizzieming and I am so thrilled to be contributing to this wonderful blog.

Today's project is my Valentine's Day Wreath.  I love making home decor projects with paper and wreaths have become my "thing"!  Here is a picture of the ingredients I used to make this project:
As you can see, I used My Mind's Eye Lovenest paper, a styrofoam wreath, ribbon (which I changed after I took this picture LOL), my Epiphany badge maker (for the rosette centers), and straight pins.  I wrapped the ribbon around the wreath, totally covering it.  Then I put my Cricut to work....I used Ribbons and Rosettes Cartridge for all of the rosettes, Lyrical Letters for the greeting (Celebrate Love) and I honestly can't remember which cart I used for the hearts, but any heart will do! Here are some pics of the cuts:


As you can see, I arranged the rosettes and the hearts around the wreath until I got it where I liked it.  Use the straight pins to attach to wreath....once they are pushed in, they stay very secure.  I like to use sheer ribbon to hang the wreath.  Here is the finished product!  This one hangs on my front door in between the storm door and the main door so it doesn't get damaged from the elements.
I hope I have inspired you to give this a try....It really is very simple, but packs quite a punch!


Friday, December 30, 2011

An Anything Goes Announcement!

Happy almost New Year's everyone! My resolution is most certainly to catch up on crafting and on updating this poor blog! I have been a bad blog mommy and I resolve to do better in 2012. But enough about that - you want to know what the announcement is, don't you?

We have decided to have a design team call! Up until now we have relied on our crafty friends and  we have decided to branch out and see what our followers have to share. We are looking for anyone who is interested in hosting one challenge the last weekend of the month. You do not need to have a blog, although if you have one that is great.

If you are interested, please email us a picture of one unpublished paper craft project and a description of what your challenge would be to pcweekendchallenge@gmail.com  - the deadline is January 15th at 12 midnight EST. Let your imaginations and your crafting run wild - you know how strict we are about rules around here. And we can't wait to see what you create! Happy Crafting!
---Allison

Sunday, October 30, 2011

Frame It Up!

Hello everyone and welcome to the Sunday edition of Paper Craft Weekend Challenge blog!  I have to thank my good friends Caroline and Allison for giving me the opportunity to be your guest designer this Sunday, the day before the ghosts, ghouls and goblins go walking in your neighborhood in search of candy, candy and even more candy!  So, with a Halloween theme in mind, I have a few projects to share with you and of course I am ready to present your challenge:
Frames

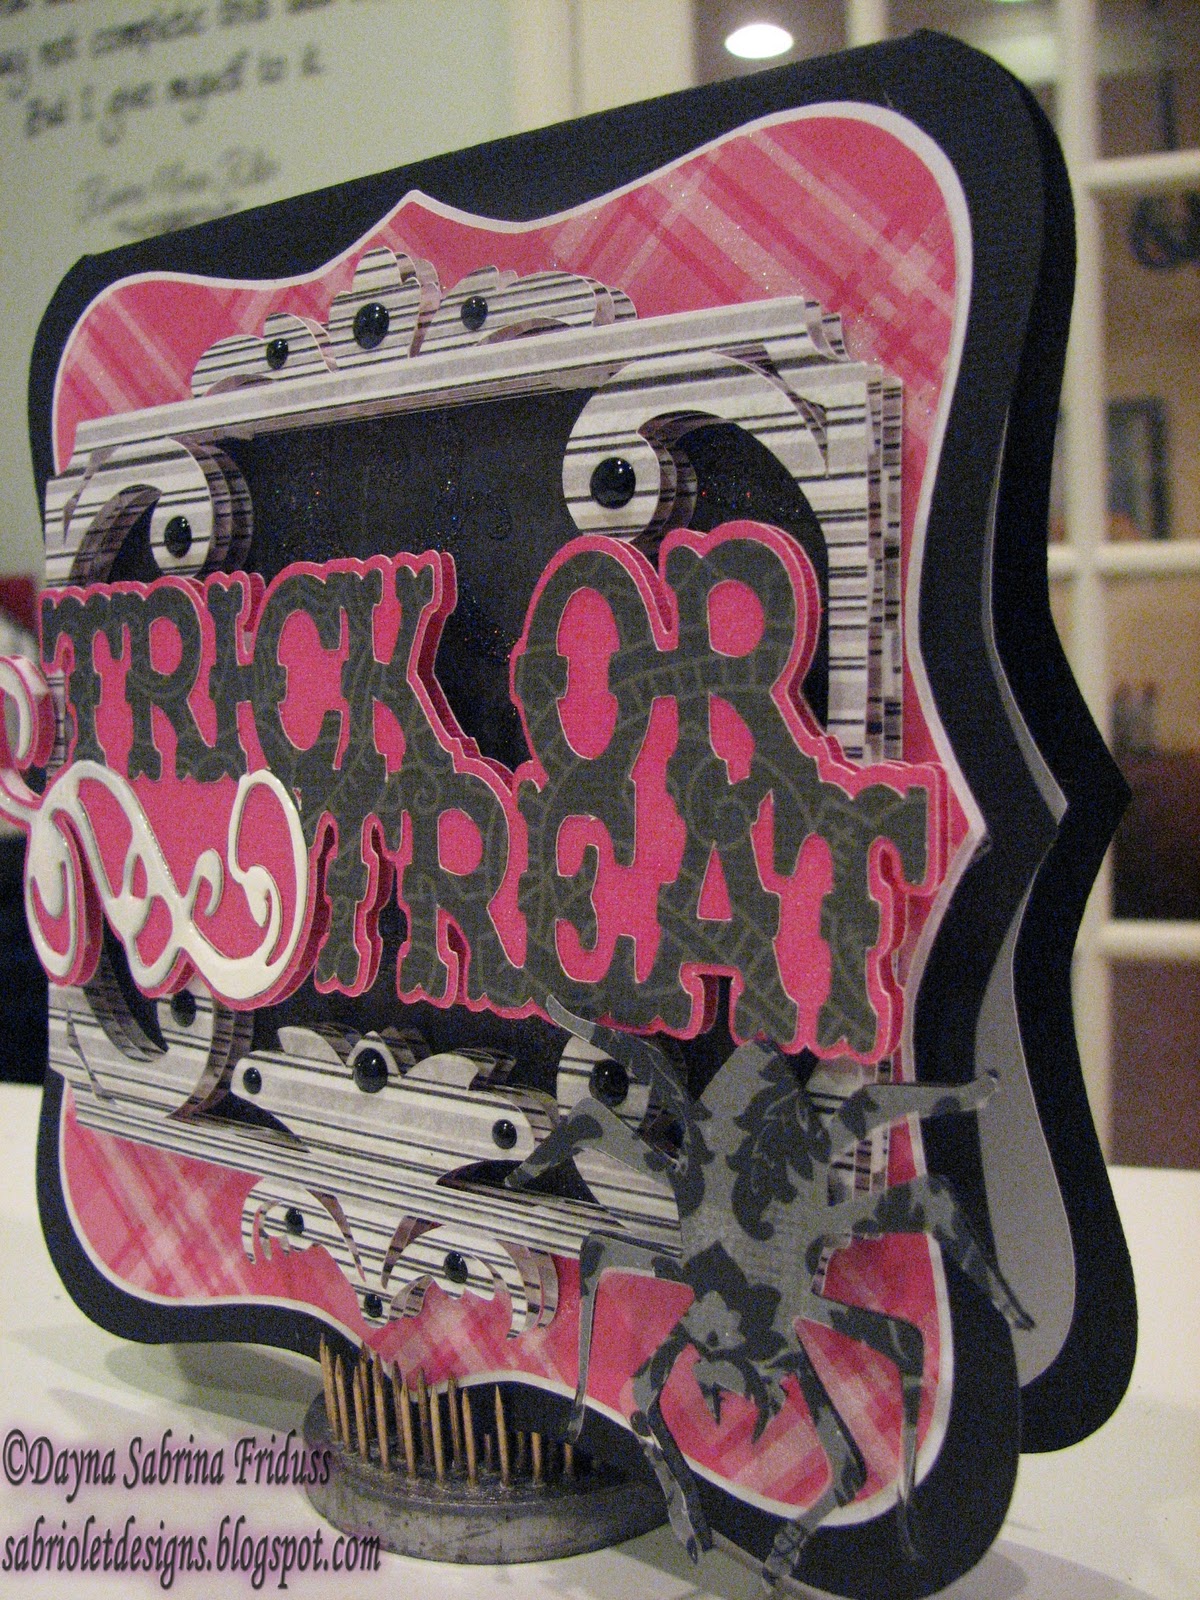
Create a project of any type using a frame and link it up at the bottom of this post.  I created two cards using frames to create a focal point. The first card's frame can be found on the Happy Hauntings cartridge, and just to prove that you can still create something Halloween themed without a Halloween cartridge, I used a frame from the Circle exclusive cartridge Sophie for the second card.


Now those of you who know me know that I am a big fan of dimension.  I mean it's difficult for me to create any project where every piece of paper or embellishment is laying flat on the paper.  I can't begin to tell you how many pop dots and dimensionals I have purchased over the last year.  I would be lost without them.  That being said, one of the best ways to create dimension is to cut out several frames and put some dimension in-between each layer.  I did this on both of these cards, and it certainly makes the focal point stand out that much more.


I am someone who hates the inside of my cards to be bare so I cut out a few additional mats and added some stamps.  Again I used Elegant Edges and Art Philosophy for the decorative mats and all of the stamps are from Papertrey Ink's Halloween tags collection.


My son's birthday party is today.  Thankfully it's not the big production that it was last year, it's just going to be family and a few friends.  I decided to make up a few quick pillow boxes for the few friends he has coming - and his little brother of course who refuses to be left out.  The pillow box image is from Easter 2010.  You can find numerous ones on different Cricut cartridges.  I prefer this one because it's easy to fold down in my opinion.  I used images from October 31st, Happy Hauntings, and Wrap It Up to cut out a Halloween themed image that I covered with a clear page protector from the inside.  And then I framed each of the images using an Elegant Edges frame.  The back of the pillow boxes has a band that I cut using Paper Lace 2.


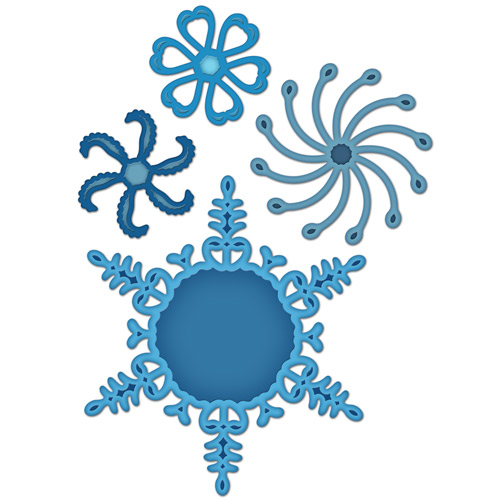
And that's it.  Okay, maybe not - there's a little blog candy to go along with this post!   I am an avid fan and collector of Spellbinder dies. I have one new set of Spellbinders Snowflake dies up for grabs - just in time for your Christmas or winter themed projects!  For those of you unfamiliar with Spellbinders, you can easily use them in most die cutting machines, including Big Shots and Cuttlebugs.  Here is a picture of the dies:


Just leave a comment at the end of this post and you are entered to win this random drawing!  I will take all comments up until next Saturday at Noon, eastern standard time.  Good luck, and thanks for stopping by Paper Craft Weekend Challenge.  I can't wait to see your framed project!

Recipe:
Paper:  K & Company Kelley Panacci, Kraft Spooky Words, DCWV Blossoms & Butterflies, DCWV Ghost & Gobblins
Cartridges:  Easter 2010, Happy Hauntings, Elegant Edges, Sophie, Art Philosophy, Wrap It Up, Paper Lace 2
Spellbinders:  Ornate Artisian Tags & Accents
Stamps:  Papertrey Ink Halloween Tags
Bling:  Imaginesence, White & Black Enamel Accents, Martha Stewart glitter

Friday, October 28, 2011

Texturize & Embellish!

Hi
This is Pam from Papillon Digital Designs & The BugBytes. Thanks Allison and Caroline for having me on as a guest designer today at Paper Crafting Weekend Challenge.
Today's challenge is to use the things around you maybe the spider webs you got to decorate your home for Halloween (like I have done here) , spiders anything even ribbons or buttons to embellish your project and add texture.
Here is my card


I have used a plain black cardstock, silver wired ribbon (which I got from Costco - isn't it pretty?), some buttons, a feather and the central image is from Dover publications - Greetingcards - which I printed out and cut out with some decorative scissors. I love Dover images.


Then I took a bit of cobwebs we get at store for decor and applied it to the cardstock. It looks better if you xyron or dilute tacky glue with water and apply with a foam brush allow to dry  and then stretch out the spider web. Using ATG gun or tape leaves some marks which can be seen otherwise.

Here's a close up of the spiderweb


 After applying the spiderweb I then added the ribbon (like a cross). Then I took some buttons and further embellished them with rhinestones and stickles and placed 2 buttons on the ribbon with glue dots. Then I took a feather and attached that and placed the center button. The rhinestones and stickles were added to bring some of the color from the image into the card else I felt it would stick out like a sore thumb.
 I inked the image - matted it with black cardstock with corners rounded and then glued it with foam dots onto the card


As for the inside of the card I used the CTMH stamp on white cardstock. Again cut it out with decorative scissors and inked with red ink and added some stickles and then glued it on to the inside of the card with foam dots. I just placed a bit of silver ribbon to give pop


And that my friends is my simple Halloween card embellished with things to add a bit of texture. Now you can even give an illusion of texture for e.g I could have taken the spider web spread it around and then sprayed with paint (mist) or glimmer mist and the web would have acted as  resist and could have got the texture of the web. So do play and add texture or give an illusion of texture and post your project for all of us to see. Thank you for having me as a guest designer once again Allison and Caroline. And readers thank you all for patiently reading this post. I look forward to see your project.
 Happy Halloween!
Pam
-

post signature


Sunday, September 25, 2011

My Challenge-an Alliteration

Hello, crafters! Carole here with the Sunday edition of this week's Paper Craft Weekend Challenge. I am so thrilled to be guesting here on Allison and Caroline's challenge blog...thanks for giving me this wonderful opportunity, ladies!

And now for the challenge. A little background first. When I first was on the Cricut message board I stumbled across a card challenge/swap group that I totally fell in love with. The leader of the group was Card Junkie (aka Sherrie Miller) and she did an awesome job. Every month she gave us an alliteration (I didn't even know what that was until I joined the group) and it was through these challenges that I was encouraged to use a wide variety of design elements in my card designs. So in honor of that group here is my alliteration challenge to you.....Red with Ribbon.  And here is my card for this challenge:

The recipe:
Card is A2 size.
Cardstock: Real Red, Black (Stampin Up)
Patterned paper: Newsprint (Stampin Up), Black and White paper stack (Me and My Big Ideas)
Cricut cuts: 4.75 inch circle (newsprint) and shadow (red)-George and Basic Shapes; "hello"- .65-Cursive 101- sizing and welding done on Gypsy
Paper punch: Boho flowers (Stampin Up)
Black ribbon-Narrows-bought on sale at Michaels
Medium glue dots (Zotz), pop dots (Stampin Up), adhesive of your choice (mine is ATG gun and tape)

Create A2 size card from black cardstock. Cut red mat at 4-1/8" X 5-3/8" and adhere to black card. Cut black printed paper at 4-1/16" X 5-1/4" and adhere to red card mat. Adhere newsprint circle to red shadow circle. Place about 2/3 of circle on card and adhere. Cut extra 1/3 of circle off using card fold as a guide. Cut welded "hello" from red cardstock. Adhere to lower right hand corner of card. Make and adhere ribbon center flowers to circle with pop dots. See ribbon center flower directions below:

Punch 3 of the largest Boho flowers from red cardstock using the Stampin Up punch. Place glue dot in center of punched flower. Using length of narrow black ribbon (start with about 15"-not sure how long so this is a safe bet) tie a simple knot at one end of ribbon. Place knot with "tail" side down into center of glue dot. Twist the ribbon as you wind it around the center of the knot, placing it into glue dot to adhere in place. Continue twisting and adhering ribbon with this method until the glue dot is completely covered with the ribbon. Cut off excess ribbon. Using a sewing needle or any thin, pointy object, tuck end of ribbon under the twisted ribbon into the glue dot to secure in place.

And there you have my Red with Ribbon creation! Now, let's see yours. To motivate you all, I am giving away a little blog candy. If you leave a comment you will receive one entry, link a Red with Ribbon creation and receive another. Contest ends midnight, Wednesday evening (September 28th). The prize is a $10 Michaels gift card. Winner will be chosen randomly (as soon as Caroline tells me how to do it) and announced Thursday morning around 8:00 am. Good luck!


Friday, September 23, 2011

Button, Button Who's Got a Button...

Hi scrappers! This is Kate from Sassy and Scrappy and I'm thrilled to be here with you all today. If you read my bio you know I have several crafting loves, but one I didn't mention is buttons. I love buttons! I use them on cards, layouts and even home decor projects. I'm going to share a few of those with you today.

First up is a home decor project:


I purchased this plain black frame and decided to spruce it up a little. As you can see I adhered buttons to the center of some of my flowers. I love the additional depth and texture they added to a "plain jane" frame.


Next up, a scrapbook page:


Here you can see I used buttons for wheels on my die cut car. I have done this several times and love how is spices up an other wise ordinary car.


For my project today I used buttons to create a border for my scrapbook page. This is the first time I've tried this, but I think the result is REALLY fun. I kept the rest of the page very simple, as always when I create a page I want the focus to be on my picture/s.


To adhere buttons I like to use glue dots, although on this page I sewed some of the buttons straight to the paper. What I love about buttons is that they're so diverse, and you can utilize them in countless ways.


Details:
  • Kraft cardstock: Bazzil
  • Pattern Paper: My Mind's Eye 'Stella and Rose'
  • Buttons: Papertrey Ink
  • White embroidery floss
  • Labels: October Afternoon
  • Stamps: Technique Tuesday 'A Date With Ali' and 'The Observant Traveler'
  • Ink: Jenni Bowlin 'Chicken Feed' and 'Cough Syrup', Memento 'Tuxedo Black'
  • Color Mist: October Afternoon 'Paper Doily'
  • Brad: My Mind's Eye
So what is your challenge?! Buttons!!! Use buttons on a card, layout or altered item. I can't wait to see what you come up with! Thanks for stopping by, have a great weekend.


Thursday, September 22, 2011

Welcome to our first Guest Designers!

We are delighted to usher in our first weekend of guest designers.Once a month we are going to invite our friends to come play with us! I am quickly discovering that the best part of this blog is seeing all of the great work everyone is linking and then getting to discover (or re-discover in some cases) your blogs! So let's keep it up! This Friday, Kate from Sassy and Scrappy will be leading us in our first challenge, and then on Sunday Carole from On My Craftroom Wall will be inspiring us for the next one. You can see their pictures and bios on our Guest Contributors Page. I can't wait to see what they (and you) have in store!