Sunday, February 26, 2012

Photo Challenge and GIVEAWAY!

Kymberlee from The Paper Midwife posting today.

I am heading off to a crafting retreat and a week away from my family!  This post will have occurred right in the middle of my trip. As per what has become my usual, I am running behind and this has caught me unprepared as I STILL don't have a crafting space! 

Here is my challenge to YOU -

Use the photo as INSPIRATION to make something - ANYTHING. What thoughts or feelings does the photo inspire in you? A color, a layout or card? Some coloring? Organizing or rearranging something? ANYTHING GOES!


Post a photo of whatever you did here and ONE person who posts a photo will win a 
 GIFT CARD to an online vendor of YOUR CHOICE
Random drawing from all photos entered will occur March 4th, 2012

GO GET BUSY!!!!


Sunday, February 19, 2012

Color Inspiration

Happy Sunday!!! I'm happy to report that it has been a FABULOUS weekend so far. Hubby and I are celebrating our 5th Wedding Anniversary. But of course I couldn't leave our readers hanging here so I have a quick project for you. This week is Inspiration week and I decided that it would be a color challenge.


A couple friends and I are doing a letter swap so we can have a piece of each other in our craft room and when I saw the colors above I knew I needed to use those for my letters. And wouldn't you know I HATE the color orange but I love pink and orange together ... go figure. LOL


Close up of flowers and butterflies


And of course I have a new love BEADS ... so since it's a piece of me I had to make some charms for the letters.

Can't wait to see what you come up with. Happy Crafting!!!!

---Caroline


Friday, February 17, 2012

Butterflies and Flowers

Hi
This is Pam from Papillondigitaldesigns  today on Papercraft Weekend Challenge.
Thank you Allison and Caroline for having me as your designer today.
It's a bit cold in Texas but warm colorful spring is almost here! And nothing says spring like flowers and butterflies. So today on Theme Friday of course I had to make something with both.
Not quite spring yet so I chose not to do very colorful.


This was cut with silhouette sd. and the card is just 4 x 4 inches. For intricate cuts silhouette is the way to go!

A peek at the silhouette file


The card base is just 2 rounded rectangles welded together. The intricate butterfly lace is a design from silhouette online store - http://www.silhouetteonlinestore.com/v2/viewShape.aspx?id=22873
Now I did not want to cut the lace out So I first inserted the mat and used a silhouette pen to trace the butterfly on to a kraft cardstock. While doing this make sure to set the card base to "no cut" (in the scissor or cut window) and just the butterfly lace to "cut" . Then after drawing the silhouette goes back to original position . DO NOT UNLOAD THE MAT. But just change your marker to blade - I used the red blade at settings 3 & 33 (ie depth and speed) - and then cut.
Next I created another file which I cut with white cardstock - again using the marker for just the sentiment "Thank you".


Then I stickled the butterfly lace design on the front with diamond stickles. I colored parts of the  scalloped butterfly doily with copic markers and stickled and blinged them. I also colored just the leaf in the  oval leaf frame  and just a dab of color in the flower corner (butterfly doily - http://www.silhouetteonlinestore.com/v2/viewShape.aspx?id=18102 ;  oval leaf frame - http://www.silhouetteonlinestore.com/v2/viewShape.aspx?id=13873 & flower corner - http://www.silhouetteonlinestore.com/v2/viewShape.aspx?id=3057 ) . I did cut a plain circle out thinking I would mat the scalloped circle but then decided not to.

Inside of the card


To just give an idea about the intricacy of the cuts here is the card next to a bic ball point pen (not the thicker gel pen but the smaller ball point pen - yep ! I am laying it on really thick aren't I ? But I just love the cameo and SD so just had to do it! Impressed ?)


Oh ! I added some pearls both the half pearl sticker and also used the perfect pearl pen apart from the stickles. I wanted to use those Candi that Caroline enabled but decided to save it and go with pearls as candi's were a bit large for this card.
Your challenge for this weekend is to include flowers and butterflies in your project.

post signature

Sunday, February 12, 2012

Use your Stash - Color You Own Bling

Hi this is Michelle here from Lady of Leisure Ink.  I prepared this post about a week ago, before I knew what Diane was going to post, and although we both chose to use some bling I think this post will follow on nicely from hers.

We've all got them, probably lots of them, because when we buy them they usually come it big packs!  The 'them' I am referring to are gems - the clear type.  Mini round gems and faceted gems, I have a whole bunch.  But you don't always want clear ones for your project, so how about coloring them for yourself using alcohol inks?

All you need are the gems, some alcohol inks, paper towel and a little patience.


Take the gems and lay them on a piece of kitchen towel (use a craft mat or something else underneath to protect your work surface.)  Then take you alcohol ink and drop a small amount on the gem - you only need a very small amount, the ink will spread over your gem.


It really is as simple as that.  Now this is where the patience kicks in, as you have to wait for the gems to dry before using them on your project.

Here are some others I colored using the clear faceted gems.


The finished project.


So grab those inks and get coloring.  As always, thanks to Caroline and Allison for inviting me to play and, thank you for stopping by - see you next time.

Michelle


Friday, February 10, 2012

Use Your Stash: Bling

Diane here again from My Time to Craft saying it's to start using the most precious items of your stash: bling. I know, I know, they're too pretty to use, but think of all the new pretty bling you can replace it with.


Before I begin, there are a couple of things I learned that I wanted to pass on, all under the umbrella of "not all bling are created equal":

  • Some off brand gems have adhesive that drys out and gets hard, so use them early or prepare to use your own adhesive.
  • You cannot always mix and match white pearls across manufacturers. Some are more white while others are more ivory, and if you find a really cheap brand, the color might chip off altogether.
  • Rhinestone swirls: some have adhesive that keeps it all in shape, some are kept as separate stones and you have to recreate the swirl yourself (I love swirls that stay together).
  • It is possible to use too much bling, especially if the paper already has foil on it.
I have an assortment of Recollections, Colorbok, K&Company, and Darice, among others.
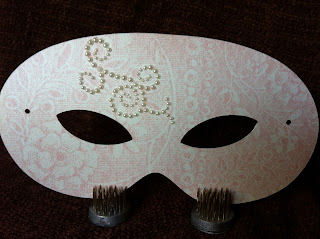
Now let's see what we can do. If you've been to my blog, you'll know that we're preparing for a masquerade-themed school auction, so I've been on a mask-making kick. I decided it was time to go through my tub of bling to add some sparkle. Here are a couple of examples.

Paper: DCWV
Rhinestones: Recollections
Hearts: Colorbok
Paper: DCWV
Rhinestones: Recollections
Hearts: Colorbok

Paper: DCWV
Rhinestones & ribbon: Recollections
Hearts: Colorbok

Paper: DCWV
Rhinestones: Darice

Paper: DCWV
Pearls: unknown

Paper: DCWV
Rhinestones: Recollections
The swirls worked well for this project, particularly if you have ones small enough to fit around the eyes on the pointed mask. The last one I had to make myself. Now it may seem like I used a lot of bling, but the first three masks came from the same package of Recollections rhinestones, ribbon, and lace (used on another project) and less than half of the Colorbok hearts, so my tub of bling is still filled to the top. Of course, whether I'm willing to part with my favorites of this collection to use as decorations...now that's another story.

So, who's brave enough to use their bling?


Tuesday, February 7, 2012

Technique Tuesday - Photo to Copics

Kymberlee posting here today from The Paper Midwife. It's the First Tuesday of the month here at PCWC so you know what THAT means....
TECHNIQUE TUESDAY!!!

I am so excited to share with everyone here today in my very first Technique Tuesday Guest Designer post! I can't thank Caroline and Allison enough for this opportunity. LOVE you guys <3

Okay enough with the sappy stuff and on to what I have for you today...

I took a Copics basic and intermediate certification class back in September and since then I have been a voracious MONSTER learning all I can and playing, experimenting, and playing some more.  One of the things I was really interested in was realistic coloring, more specifically making photos into line drawings to color.  Now I am no pro photographer but I happen to have a daughter that IS and as an added bonus, she also has some pretty adorable subjects that I wanted to color.  BOOYA!

I struggled trying to figure out HOW to convert my photos using Photoshop but rather than me making this long post even longer I am going to give you a CHEAT and HUGE shortcut to circumvent the learning curve.  You can find a step by step tutorial from photoshopbuzz.com HERE or just download the FREE ACTION HERE

Now that you know how to turn you favorite into a  line drawing, you may need to tweak it some using your contrast adjustment layer to lighten or darken the photo depending on how much guidance you want in your coloring.  I went for broke and just wanted the major landmarks so I took this original photo of my grandson "Roo":

Stripped it down to THIS:

then printed it out on my LASER printer onto BeePaper 110# Artist Marker paper


Then using my Copics and the original photo as my guide, I colored it to THIS:

I did the other grandson too so I can frame them for my daughter for Valentines.
I need some practice but I am pretty happy with this first attempt.

and a self portrait...

Now grab your favorite photograph and your markers and don't be scurrrrred...GO FOR IT!!! 


Sunday, February 5, 2012

Use Your Stash - Chipboard & Glitter

Hi Everyone!  This is Elise again from The Gypsy in Us,  http://thegypsyinus.blogspot.com/!  I am so happy to be here this weekend with a great challenge to just use your stuff!  At first I thought this would be a challenge to use chipboard, so I did.  As I was working on my project, I thought to myself that the chipboard is really not that prevalent, so I figured I would make the challenge to use glitter, so I put glitter on my project.  Whelp, that old brain of mine starting thinking again, dangerous, I know, and I added a button thinking the challenge could be to use buttons.  Aw heck....just use your stuff!!!!

I am still working on Valentine's Day (it is my favorite crafting holiday!  I love pink and red!).  Not sure if you know or not, but my daughter, Lizzy and I are having a Valentine's Day Tea Party for some friends of ours.  I already made some stuff which you can see on my blog, but thought a cute favor for the girls would be a picture to remember the day with (sorry Allison if that that is not a good sentence...can't remember if you are supposed to end a sentence with "with" or not!)  Since I got the greatest little polaroid camera for Christmas (well actually it is Fuji, but who cares?!) that takes the cutest size pictures, I decided to design a frame to fit the picture.

I used the Cricut Fancy Frames cart and cut the simple rectangle frame out at 3 inches (that is actually the length of the picture you are using)....then I cut the rectangle border at 3 inches as well....you really can't see the border very well in the picture, but it pops on the frame.  All of the paper I used is from Papertreyink.com.  I used that red double sided tape all around the rectangle border and glittered it using Stickles diamond glitter (yes, I said Stickles glitter!  I am lucky enough to live about 20 minutes from where Ranger is located and every fall they have a warehouse sale which is where I found that awesome stuff!)

From this side view you can see that I cut the verticle easle frame out of chipboard.  I used my regular blade and only had to do 2 cuts to get it through.  By the way, I cut this piece at 4.5 inches. I also just manually cut some chipboard to the size of the frame and glued the patterned paper to that....I made sure to leave the top open so i could slide the picture in although you could just put the picture in before gluing the paper to the chipboard.  I left the opening because I plan to take pictures of the girls during the party, slide them in the frame and voila!  The heart was cut using the Imagine standard heart that comes loaded on the machine.  I cut it at 1.5 inches and ran it through the Cuttlebug Swiss Dot folder.  I punched holes in the middle for the bakers twine and button and adhered the whole shebang with a pop dot.  And there you have it.....a cute little Valentine's Day frame.
I just had to share my cute little Fuji instant film camera...so in love with it!!!


Friday, February 3, 2012

Card Sketch Challenge

Hello everyone! It's me - quickly stopping in for the monthly sketch challenge. I do have to apologize - I only have one sketch to share with you this month - but I have decided that I will not feel guilty about it. I got done what I could and that is the best I could do for right now. I hope you are okay with it too!

I have recently become enamored with digital stamps, but alas - I have no real markers, just some watercolor markers and pencils. *SIGH* I hope to someday change this situation but don't see it happening any time in the very near future. Until then I shall have to be content with my pencils and my Crayolas and drooling over the video of the new Tim Holtz markers from CHA. Now that I am done whining - onto my card sketch!


And now for my card:


I used a card base from Damask Decor cut at 5 inches. The adorable little baby is from Mo's Digital Pencil Too and I am absolutely enamored of her work - many thanks to Kymberlee for gifting me with this image. I colored him with my pencils (not my Crayolas) and then added a ribbon and a ribbon tag. I finally finished off with some adhesive pearls. This card was for a shower for a good friend and I created a few other gifts that I hope to get up on my personal blog this weekend (fingers crossed!).

So your sketch challenge for this month is to incorporate a stamped or even a printed image into your card (or layout - you know we aren't picky) - and maybe next  month I will have a layout for you! Happy Crafting!
---Allison