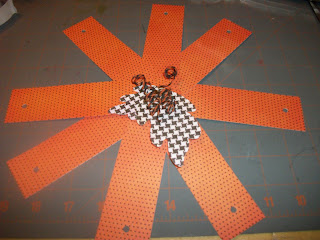
Another view
Oh you want to know how I made it?? I suppose I could show you - but let me show you my favorite pumpkin first! This is the Halloween edition - and you should know right now that I seriously heart Halloween - so I am so in love with how this turned out. In fact I love it so much I may be crazy enough to make a bunch of them for my daughter's religion class. So without further ado - ta-da!!
And now for the instructions! I started with 8 strips of paper cut into 1 1/2 by 6 inch strips - you get that many out of one 8 1/2 by 11 piece of paper. Those strips need a hole punched at each end about 1 inch in. (This paper is DCWV Midnight Spell.) Then you also need two leaves from Mother's Day Bouquet (cut at 2.5 and 3 inches), some baker's twine that I made curly and two brads.
Thread the twine in the center of one of the brads - I realize it is hard to see but there is a brad in there.
Then attach the brad to the leaves and all the strips of paper and fasten them together.
Fan out the strips into a star shape and then flip it over.
Starting with the piece that is closest to you - put the second brad the opposite way - with the top on the inside of the pumpkin.
Then add all the other pieces - and I have found the easiest way to do that is to go around the circle. If you are going to fill with candy - leave the last piece unattached so you can put the candy in.
Fill the inside with candy - I used gum because the Hershey's kisses I had bought for this project had mysteriously disappeared - yeah that's what happened to them.
Then you can add the last strip and seal it up! Putting the brad the opposite way makes it easier for the receiver to open if they don't want to slide the pieces apart.
and then I will say it again: ta-da!
And guess what?? I am not even done yet! Someone posted on the Cricut message board is anyone had directions for a 3-D acorn - and I got to thinking (always a dangerous occurrence) and while I don't love it as much as the pumpkins (shh! don't tell) it isn't completely terrible.
In the acorn's case, I welded some leaves together, ran it through the mesh cuttlebug folder, and lightly inked it. The bottom is done with kraft cardstock.
And now my part of the party is done - time to pass the party torch onto you guys and see what happens! Remember - this weekend's theme is "anything goes" - so if this project reminds you that you have to do a Christmas card and that is what you make and post- I am okay with that! Happy crafting!
---Allison


Wow Allison these are fabulous!
ReplyDeleteTotally cute Allison! Wish I had this idea back when my daughter was in grade school!!
ReplyDeleteLove both projects, Allison. Great job! I am always impressed when someone sees something and figures out how to do it on their Gypsy/Cricut/Design studio. I would love to be able to contribute this weekend, but I doubt it's going to happen. I can cheer everyone else on though!
ReplyDeleteWhat a cute idea for a treat box! You know, the same thing happens to chocolate at my house, it just magically disappears!
ReplyDeleteAdorable Allison
ReplyDeleteThose are fantastic!
ReplyDeleteI love this!!!!! Gonna take time to play today.
ReplyDelete